Introduction to Chocolate Cream Layer Cake Squares
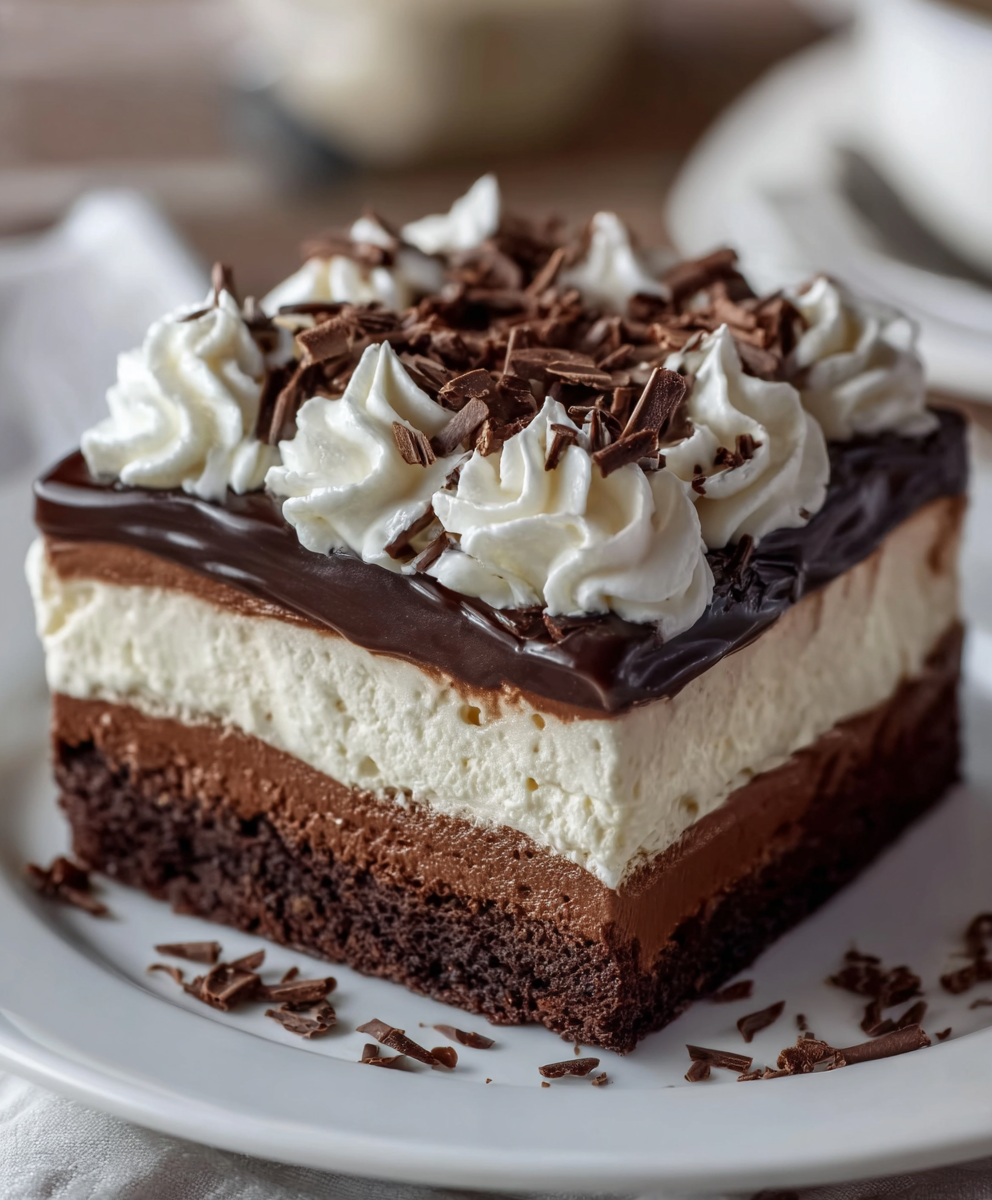
Welcome to the world of indulgence with my Chocolate Cream Layer Cake Squares! If you’re anything like me, you know that life can get busy, and sometimes, we need a quick solution to satisfy our sweet cravings. These delightful squares are not just a treat; they’re a showstopper that will impress your loved ones at any gathering. Imagine a fudgy chocolate base topped with creamy layers and chocolate curls, all coming together in a symphony of flavors. Trust me, this recipe is perfect for those moments when you want to create something special without spending all day in the kitchen!
Why You’ll Love This Chocolate Cream Layer Cake Squares
These Chocolate Cream Layer Cake Squares are a dream come true for any home cook! They’re incredibly easy to whip up, making them perfect for busy weeknights or last-minute gatherings. The rich, fudgy chocolate base paired with the creamy filling creates a taste sensation that’s hard to resist. Plus, they look stunning on any dessert table, ensuring you’ll be the star of the show without breaking a sweat!
Ingredients for Chocolate Cream Layer Cake Squares
Gathering the right ingredients is the first step to creating these delightful Chocolate Cream Layer Cake Squares. Here’s what you’ll need:
- Cocoa powder: This is the heart of our fudgy base, giving it that rich chocolate flavor.
- Heavy cream: Essential for making a luscious ganache and adding creaminess to the filling.
- Cream cheese: This adds a tangy richness to the filling, balancing the sweetness perfectly.
- Dark chocolate: Choose high-quality chocolate for a deeper flavor in the ganache.
- Sugar: Sweetens the cake and filling, making every bite a delightful experience.
- Eggs: They provide structure and moisture to the cake, ensuring it’s fudgy and delicious.
- Butter: Adds richness and helps create that melt-in-your-mouth texture.
- Vanilla extract: A splash of vanilla enhances the overall flavor, making it even more irresistible.
- Whipped cream topping: This lightens the cream cheese filling and adds a fluffy texture.
- Chocolate shavings: For garnish, these add a touch of elegance and extra chocolatey goodness.
For those looking to customize, consider using milk chocolate instead of dark for a sweeter taste, or Greek yogurt as a lighter alternative to cream cheese. You can find all the exact measurements at the bottom of the article, ready for printing!
How to Make Chocolate Cream Layer Cake Squares
Now that we have our ingredients ready, let’s dive into the fun part: making these Chocolate Cream Layer Cake Squares! Follow these simple steps, and you’ll be on your way to creating a dessert that will leave everyone asking for seconds.
Step 1: Bake the Fudgy Chocolate Cake Base
Start by preheating your oven to 350°F (175°C). In a mixing bowl, combine cocoa powder, melted butter, sugar, eggs, and vanilla extract. Mix until smooth and well combined. The batter should be thick and fudgy, just like a warm hug on a chilly day!
Pour the batter into a greased baking dish and spread it evenly. Bake for about 30 minutes, or until a toothpick inserted in the center comes out clean. Once baked, let it cool completely in the pan. This cooling time is crucial, as it allows the cake to set properly before we add the creamy layers.
Step 2: Prepare the Cream Cheese Filling
While the cake cools, let’s whip up the cream cheese filling. In a mixing bowl, beat the cream cheese until smooth. Gradually add the whipped cream topping, mixing until it’s light and fluffy. This filling is like a cloud of deliciousness!
Once the cake is cool, spread the cream cheese mixture generously over the top. Make sure to cover every inch, as this layer is where the magic happens. The creamy filling will balance the rich chocolate base beautifully.
Step 3: Make the Dark Chocolate Ganache
Next, it’s time to create the dark chocolate ganache. In a small saucepan, heat the heavy cream over medium heat until it just begins to simmer. Remove it from the heat and add the chopped dark chocolate. Stir until the chocolate melts completely and the mixture is smooth and glossy. This ganache is the cherry on top of our cake squares!
Pour the ganache over the cream cheese layer, allowing it to flow to the edges. The glossy finish will make your dessert look like it came straight from a bakery!
Step 4: Chill the Layers
Now comes the hardest part: waiting! Cover the dish with plastic wrap and chill it in the refrigerator for at least 3 hours. This chilling time is essential for the layers to set properly. Trust me, the wait will be worth it when you take that first bite!
Step 5: Decorate with Whipped Cream and Chocolate Curls
Once the layers are firm, it’s time to get creative! Use a piping bag to pipe whipped cream rosettes on top of the ganache. This adds a lovely touch and makes your dessert look extra fancy.
Finish off by garnishing with chocolate curls or shavings. The more, the merrier! This final touch will make your Chocolate Cream Layer Cake Squares truly irresistible.
Step 6: Slice and Serve
When you’re ready to serve, take a sharp knife and slice the cake into neat squares. I find it helpful to wipe the knife with a damp cloth between cuts for clean edges. Serve these chilled squares on a beautiful platter, and watch as your guests’ eyes light up!
Enjoy the compliments that come your way, and don’t forget to save a square for yourself!
Tips for Success
- Always let the cake cool completely before adding the cream layer to prevent melting.
- Use high-quality dark chocolate for the ganache; it makes a world of difference!
- Chill the cake for the full 3 hours to ensure the layers set properly.
- For a fun twist, try adding a splash of espresso to the ganache for depth.
- Keep your knife warm when slicing for cleaner cuts.
Equipment Needed
- Mixing bowls: Use any size you have; a large bowl is great for mixing the batter.
- Whisk or electric mixer: A whisk works, but an electric mixer saves time and effort.
- Baking dish: A square or rectangular dish is perfect for these cake squares.
- Piping bag: If you don’t have one, a zip-top bag with a corner snipped works too!
- Spatula: Essential for spreading the cream cheese filling evenly.
Variations
- Nutty Delight: Add chopped nuts like walnuts or pecans to the chocolate base for a crunchy texture.
- Mint Chocolate: Incorporate a few drops of peppermint extract into the cream cheese filling for a refreshing twist.
- Gluten-Free Option: Substitute all-purpose flour with almond flour or a gluten-free baking blend for a gluten-free version.
- Fruit Fusion: Layer fresh raspberries or strawberries between the cream cheese and ganache for a fruity surprise.
- Vegan Version: Use dairy-free cream cheese and coconut cream for the filling, and replace eggs with flaxseed meal.
Serving Suggestions
- Pair these Chocolate Cream Layer Cake Squares with a scoop of vanilla ice cream for a delightful contrast.
- Serve alongside fresh berries to add a pop of color and freshness to your dessert plate.
- For drinks, consider a rich coffee or a glass of cold milk to complement the chocolate.
- Present on a decorative platter, garnished with mint leaves for an elegant touch.
FAQs about Chocolate Cream Layer Cake Squares
Can I make Chocolate Cream Layer Cake Squares ahead of time?
Absolutely! These squares can be made a day in advance. Just ensure they are well covered in the fridge to keep them fresh. The flavors will meld beautifully overnight!
What can I substitute for cream cheese in the filling?
If you’re looking for a lighter option, Greek yogurt works well. For a dairy-free alternative, try using vegan cream cheese. Both will still give you that creamy texture!
How do I store leftover Chocolate Cream Layer Cake Squares?
Store any leftovers in an airtight container in the refrigerator. They’ll stay fresh for up to 3 days, but I doubt they’ll last that long!
Can I freeze these cake squares?
Yes, you can freeze them! Just wrap each square tightly in plastic wrap and then place them in a freezer-safe container. They’ll keep for about a month. Thaw in the fridge before serving.
What’s the best way to cut the cake into squares?
To achieve neat squares, use a sharp knife and wipe it clean between cuts. This helps prevent the layers from sticking and keeps your squares looking beautiful!
Final Thoughts
Creating these Chocolate Cream Layer Cake Squares is more than just baking; it’s about sharing joy and deliciousness with those you love. Each bite is a celebration of rich chocolate and creamy goodness that brings smiles all around. I cherish the moments spent in the kitchen, crafting this dessert, and the laughter that follows when I serve it. Whether it’s a special occasion or a simple family dinner, these squares are sure to impress. So, roll up your sleeves, embrace the process, and enjoy the sweet rewards of your hard work. Happy baking!
Print
Chocolate Cream Layer Cake Squares that Impress Everyone!
- Total Time: 3 hours 50 minutes
- Yield: 9–12 squares 1x
- Diet: Vegetarian
Description
A fudgy chocolate base topped with creamy layers and chocolate curls, perfect for impressing guests.
Ingredients
- 1 cup Cocoa powder
- 1 cup Heavy cream
- 8 oz Cream cheese
- 8 oz Dark chocolate
- 1 cup Sugar
- 3 Eggs
- 1/2 cup Butter
- 1 tsp Vanilla extract
- 1 cup Whipped cream topping
- Chocolate shavings for garnish
Instructions
- Bake a fudgy chocolate cake base with cocoa, butter, sugar, eggs, and vanilla; cool completely.
- Prepare a cream cheese and whipped cream filling, spreading thickly over the cooled cake base.
- Melt dark chocolate with cream to make a smooth ganache and pour over the creamy layer.
- Chill for at least 3 hours until firm and set.
- Pipe whipped cream rosettes on top.
- Garnish generously with chocolate curls or shavings.
- Slice into neat squares and serve chilled.
Notes
- Ensure the cake is completely cooled before adding the cream layer.
- For a richer flavor, use high-quality dark chocolate.
- Chilling time is crucial for the layers to set properly.
- Prep Time: 20 minutes
- Cook Time: 30 minutes
- Category: Dessert
- Method: Baking
- Cuisine: American
Nutrition
- Serving Size: 1 square
- Calories: 250
- Sugar: 18g
- Sodium: 150mg
- Fat: 15g
- Saturated Fat: 9g
- Unsaturated Fat: 4g
- Trans Fat: 0g
- Carbohydrates: 30g
- Fiber: 2g
- Protein: 3g
- Cholesterol: 50mg


