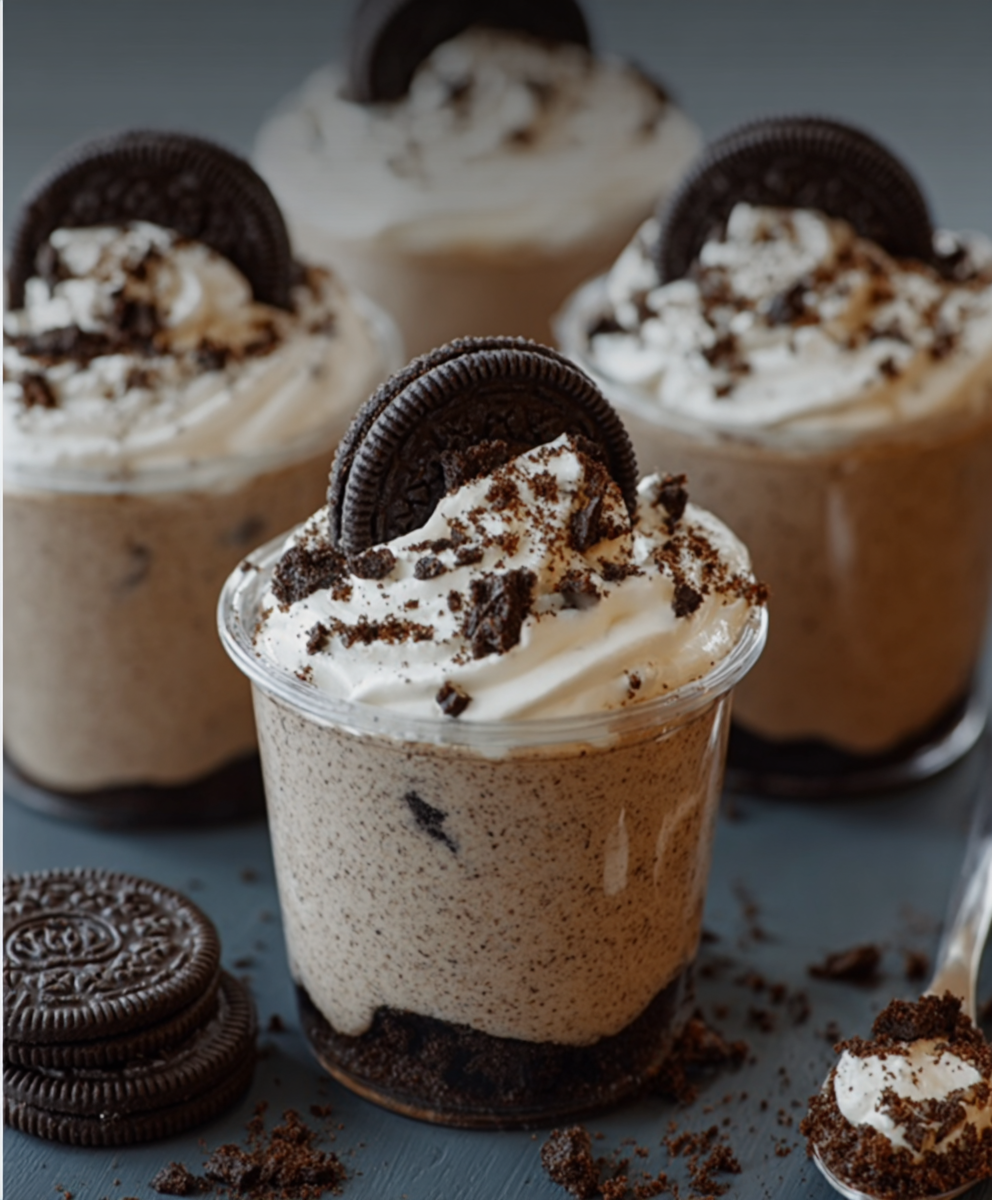
Introduction to Cookies & Cream Pudding Cups
Hey there, fellow dessert lovers! If you’re anything like me, you know that life can get a bit hectic. That’s why I’m excited to share my recipe for Cookies & Cream Pudding Cups. This delightful treat is not just a quick solution for a busy day; it’s also a way to impress your loved ones with minimal effort. Imagine creamy, dreamy pudding loaded with crushed cookies, all coming together in just minutes! Trust me, these pudding cups are a sweet escape that will make your taste buds dance with joy.
Why You’ll Love This Cookies & Cream Pudding Cups
These Cookies & Cream Pudding Cups are a game-changer for anyone craving a quick dessert. They come together in a flash, making them perfect for last-minute gatherings or a sweet treat after dinner. The combination of creamy pudding and crunchy cookie bits creates a delightful texture that’s simply irresistible. Plus, they’re no-bake, so you can whip them up without turning on the oven. What’s not to love?
Ingredients for Cookies & Cream Pudding Cups
Let’s gather our ingredients for these delightful Cookies & Cream Pudding Cups! Each component plays a vital role in creating that creamy, dreamy texture we all crave.
- Instant vanilla pudding mix: This is the star of the show! It thickens quickly and provides a sweet, creamy base.
- Cold milk: Essential for mixing with the pudding mix. The colder, the better for that perfect consistency!
- Crushed chocolate sandwich cookies: These add a delightful crunch and rich chocolate flavor. Feel free to use your favorite brand!
- Whipped topping: This light and airy addition makes the pudding even creamier. You can use store-bought or homemade.
- Cream cheese: Optional, but it adds an extra layer of creaminess. If you’re feeling adventurous, give it a try!
- Sugar: Just a touch to enhance the sweetness. Adjust according to your taste!
- Whole cookies: These are perfect for garnishing your pudding cups, adding a fun touch to the presentation.
- Extra crushed cookies: Sprinkle these on top for that extra crunch and visual appeal.
For exact measurements, check the bottom of the article where you can find everything listed for easy printing. Now, let’s get ready to whip up some magic!
How to Make Cookies & Cream Pudding Cups
Now that we have our ingredients ready, let’s dive into the fun part: making these Cookies & Cream Pudding Cups! Follow these simple steps, and you’ll have a delicious dessert in no time.
Step 1: Whisk the Pudding Mix
Start by grabbing a mixing bowl. Add the instant vanilla pudding mix and cold milk. Whisk them together for about two minutes. You want the mixture to thicken up nicely. It should be smooth and creamy, like a soft cloud!
Step 2: Optional Cream Cheese Addition
If you’re feeling adventurous, this is where you can add the softened cream cheese. Beat it in along with the sugar. This step is optional, but it gives the pudding an extra layer of creaminess that’s hard to resist!
Step 3: Stir in Crushed Cookies
Next, gently fold in the crushed chocolate sandwich cookies. This is where the magic happens! The cookie bits will add a delightful crunch and rich flavor to your pudding. Make sure to mix them in evenly, so every bite is a treat!
Step 4: Spoon into Serving Cups
Now, it’s time to spoon the pudding mixture into small serving cups. I like to use clear cups so everyone can see those beautiful layers. Fill them up, but leave a little space at the top for the whipped topping!
Step 5: Chill the Pudding
Pop those cups into the fridge and let them chill for at least 30 minutes. This step is crucial for achieving the best texture. Plus, it gives you a little time to relax while your dessert sets!
Step 6: Add Whipped Topping
Once the pudding is chilled, it’s time to add a dollop of whipped topping on each cup. This fluffy layer adds a lightness that perfectly complements the creamy pudding. Don’t be shy—go for a generous scoop!
Step 7: Garnish and Serve
Finally, sprinkle some extra crushed cookies on top for that added crunch. Place a whole cookie on each cup for a fun garnish. Now, your Cookies & Cream Pudding Cups are ready to impress! Serve them cold and watch everyone’s faces light up with delight.
Tips for Success
- Chill the pudding cups for at least 30 minutes for the best texture.
- Use a whisk for a smooth pudding; it helps avoid lumps.
- Feel free to adjust the amount of crushed cookies based on your preference.
- For a fun twist, try different flavored pudding mixes!
- Double the recipe for larger gatherings; everyone will want seconds!
Equipment Needed
- Mixing bowl: A medium-sized bowl works best. You can also use a large measuring cup if you’re short on space.
- Whisk: A standard whisk is perfect, but a fork can do the job in a pinch!
- Spoon: For scooping the pudding into cups. A small ice cream scoop makes it even easier.
- Serving cups: Clear plastic or glass cups showcase the layers beautifully. Any small bowls will work too!
Variations
- Chocolate Lovers: Swap out the vanilla pudding for chocolate pudding for an extra chocolatey treat!
- Nutty Twist: Add chopped nuts like almonds or walnuts for a crunchy texture and nutty flavor.
- Fruit Infusion: Mix in some fresh berries or banana slices for a fruity twist that brightens up the dessert.
- Gluten-Free Option: Use gluten-free chocolate sandwich cookies to make this dessert suitable for gluten-sensitive friends.
- Vegan Version: Substitute the cream cheese with a vegan cream cheese and use a plant-based whipped topping for a dairy-free delight.
Serving Suggestions
- Pair these Cookies & Cream Pudding Cups with a scoop of vanilla ice cream for an extra indulgent treat.
- Serve alongside fresh fruit like strawberries or raspberries for a refreshing contrast.
- For a fun presentation, use colorful cups or layer the pudding in mason jars.
- Offer a selection of toppings like chocolate syrup or sprinkles for guests to customize their cups.
FAQs about Cookies & Cream Pudding Cups
Got questions about these delightful Cookies & Cream Pudding Cups? I’ve got you covered! Here are some common queries that might pop up while you’re whipping up this no-bake dessert.
Can I make Cookies & Cream Pudding Cups ahead of time?
Absolutely! These pudding cups can be made a day in advance. Just keep them covered in the fridge until you’re ready to serve. They’ll taste just as delicious!
What can I use instead of chocolate sandwich cookies?
If you’re not a fan of chocolate cookies, feel free to use vanilla sandwich cookies or even graham crackers for a different flavor profile. The pudding will still be creamy and delightful!
How long do these pudding cups last in the fridge?
These Cookies & Cream Pudding Cups can last up to three days in the fridge. Just make sure they’re covered to keep them fresh and tasty!
Can I freeze Cookies & Cream Pudding Cups?
While you can freeze them, the texture may change once thawed. I recommend enjoying them fresh for the best experience. But if you’re in a pinch, go ahead and freeze!
What’s the best way to serve these pudding cups?
Serve them chilled, topped with extra cookie crumbles and a whole cookie for that wow factor. They’re perfect for parties, picnics, or just a sweet treat at home!
Final Thoughts
Creating these Cookies & Cream Pudding Cups is like crafting a little piece of happiness in your kitchen. The joy of mixing creamy pudding with crunchy cookie bits is truly delightful. Each spoonful is a reminder that simple ingredients can lead to extraordinary flavors. Whether you’re sharing them at a gathering or enjoying them solo after a long day, these pudding cups bring smiles all around. So, roll up your sleeves and dive into this no-bake adventure. Trust me, once you make them, you’ll find yourself dreaming up excuses to whip up another batch!
Print
Cookies & Cream Pudding Cups: Quick, Irresistible Delight!
- Total Time: 45 minutes (including chilling)
- Yield: 6 pudding cups
- Diet: Vegetarian
Description
Creamy, dreamy pudding loaded with crushed cookies, whipped topping, and cookie crumbles — an irresistible no-bake dessert in minutes!
Ingredients
- Instant vanilla pudding mix (1 box, 3.4 oz)
- Milk (2 cups, cold)
- Crushed chocolate sandwich cookies (12–15 cookies)
- Whipped topping (1 cup)
- Cream cheese (4 oz, softened — optional for extra creaminess)
- Sugar (2 tbsp)
- Whole cookies (for garnish)
- Extra crushed cookies (for topping)
Instructions
- Whisk pudding mix with cold milk for 2 minutes until thickened.
- (Optional) Beat in cream cheese and sugar for a richer texture.
- Gently stir crushed cookies into the pudding mixture.
- Spoon pudding into small serving cups and chill for 30 minutes.
- Add a dollop of whipped topping on each cup.
- Sprinkle extra cookie crumbs and place one whole cookie on top.
- Serve cold: Perfect for parties, picnics, or quick sweet cravings.
Notes
- Chill the pudding cups for at least 30 minutes for the best texture.
- Feel free to adjust the amount of crushed cookies based on your preference.
- This recipe can be easily doubled for larger gatherings.
- Prep Time: 15 minutes
- Cook Time: 0 minutes
- Category: Dessert
- Method: No-bake
- Cuisine: American
Nutrition
- Serving Size: 1 pudding cup
- Calories: 250
- Sugar: 18g
- Sodium: 150mg
- Fat: 10g
- Saturated Fat: 5g
- Unsaturated Fat: 3g
- Trans Fat: 0g
- Carbohydrates: 35g
- Fiber: 1g
- Protein: 3g
- Cholesterol: 20mg


